| << Previous | Learning Trail | Contents | Section 5: Schemes | Next >> |
| StrataBugs Learning Trail | Section 5: Schemes |
Stratigraphic Scheme dialog
This dialog enables you to add or edit a stratigraphic (i.e. Chronostratigraphic, Lithostratigraphic, Biozone or Sequence) scheme.
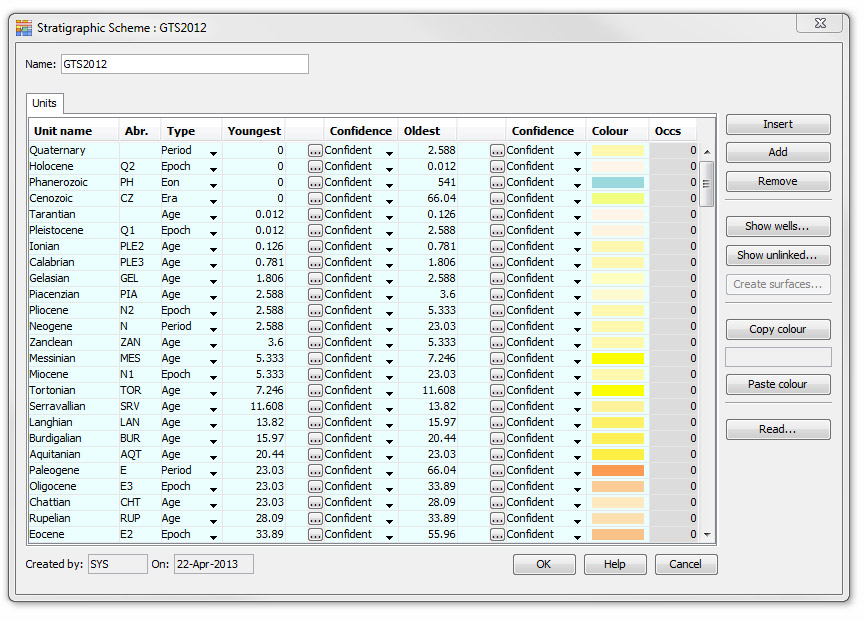
This includes building a new scheme from scratch by adding units one at a time. Each unit in a scheme is displayed in a separate row. The example below is of a chronostratigraphic scheme, but the appearance is similar for all stratigraphic scheme types. For sequence schemes, there are two tabs: Units and Surfaces, whereas for the other schemes types there will only be a Units tab.
Biozone scheme must have a discipline. Sequence schemes must have a sequence type (correlative unconformities are represented by sequence boundaries in a depositional scheme, and maximum flooding surfaces in a genetic scheme).
Biozone and Sequence schemes must be linked to a Timescale or chronostratigraphy scheme (its 'parent'). This means that all schemes are tied to a specific chronostratigraphic framework, i.e. related to the same absolute ages. Absolute ages are important when deriving depth/age profiles for any well section, and for comparing different sections. Lithostratigraphic schemes do not always use absolute ages and are thus exempt from this rule. Biozone schemes may have a sequence scheme parent (which itself has a chronostratigraphic parent) because sequence units commonly subdivide chronostratigraphic sub-ages.
If there are pre-existing units in a scheme pressing the Insert button will enable you to add an additional row above the selected row. Press the Add button to add a new row at the end of the list.
Hint: The quickest way to add a new scheme is to add lots of blank rows, and then navigate around the table entering values using your keyboard's TAB (forwards) and ALT + TAB (backwards) and up and down arrow keys. When you tab to the Type column, use the down-arrow to drop down the list, select the type using the arrow keys and then press ENTER.
Hint: It doesn't matter if you build a scheme using insert or add procedure, except that you may find things less confusing if you keep units in stratigraphic order!
Note: when you close and reopen the dialog, the units will be shown in Age order. You can reorder the columns at any time by clicking on the column header. Holding the shift key whilst clicking on the column header will reverse the order of sorting.
Press the Remove button to delete a row from the list.
Any unit can be edited by typing directly into the appropriate field. The colour can be assigned by double-clicking in the colour column. You can also 'pick up' (copy) a colour from one row and paste it onto another row, using the Copy/Paste Colour buttons. The selected colour shows in a field between these buttons.
Abr. | The abbreviation assigned to a unit is optionally used in charts to substitute a long name where there is insufficient space in the interval. |
Type |
Every unit belongs to a hierarchy level or type. Units in the same level cannot overlap. In any scheme panel template you can hide hierarchy levels of your choice. You can change the default names of the hierarchy levels for each scheme type from the Control Panel Config menu. |
Youngest/ |
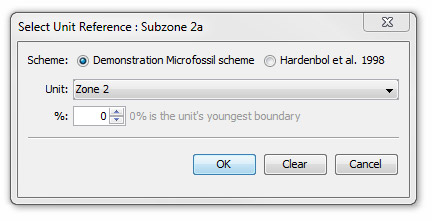
These fields define the top and base of each unit in millions of years (Ma). You can leave them all at 0 if you do not want to enter absolute ages. The blank column next to the Youngest and Oldest columns allow you to enter the boundary age in terms of another unit (reference unit), either from the same scheme or from the parent scheme. This is useful if you know that the units at a lower level are arbitrarily derived from a higher level (e.g. Zone 1 is divided into Sub-Zones 1a and 1b, each at 50%). It can also be used where the boundary age is derived from the parent chronostratigraphy (e.g. the youngest boundary of Zone 1 coincides with the youngest Tortonian). Press the "..." in the unit's row to open the Unit Reference dialog:
Select the scheme and enter a percentage. When you press OK the age will be calculated and entered into the youngest/oldest field as an absolute age. However, if the reference unit changes, the age of this unit will also be updated. These 'derived' ages are plotted on charts in brackets if they are denoted to be 'confident'; otherwise they are not plotted at all. |
Confidence |
You can indicate your confidence in the youngest or oldest boundaries. Confident boundaries are plotted with a solid line; probable with a dashed line and possible with a dotted line. |
Occs | The Occs column displays the number of times the unit (or surface) has been recorded in the database. For sequence schemes, the Surfaces column shows the surfaces which are related to the unit in the row, and on the Surfaces tab, the Unit column will display the unit associated with the surface in the row. |
Lithostratigraphy Schemes
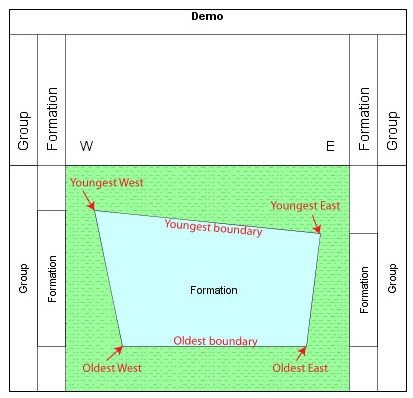 | Lithostratigraphic schemes have some extra fields to allow for diachronous and contemporaneous units. The four corners of each unit are described by the points youngest east/west and oldest east/west (see diagram right). Each point is described by an age in Ma and a percentage east. The East/West notation is for the purpose of entering the scheme and does not refer to real compass positions (the text can be changed on charts). No lithostratigraphic unit can overlap any other, regardless of type. Lower level units must fit entirely within their higher level 'parent'. You can choose a lithotype as well as a colour for each unit. |
When editing a lithostratigraphy scheme, a "Graphic" tab is available. This is an interactive tool which enables you to build the scheme graphically. It shows a chart including a panel for the current scheme.
Open a scheme block template Press the icon to open a scheme block template. If the template contains a panel for the current scheme, you can use this panel to edit the scheme; otherwise a new panel will be added temporarily. The settings for this template will be saved for the next time you edit the scheme.
Edit units Click and drag the corners of units to move them.
Click and drag anywhere inside the unit to move the whole unit and any units it contains.Hold down CTRL to change only the age values (move nodes up and down). Hold down ALT to change only the x values (move nodes left and right).
Add new units Hold down the CTRL key and drag to create a new unit. If you start dragging within an existing unit then the new unit will be trimmed so that it does not overlap.
The graphic tool will allow you to create a scheme which is not valid (i.e. has overlapping units). The scheme is not checked for errors or saved until you press OK on the dialog. You are advised to do this regularly as you build the scheme!
Show Wells...
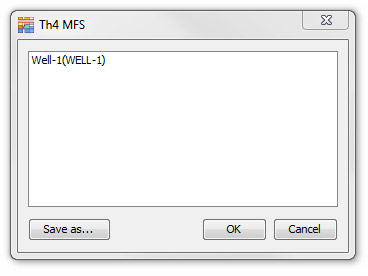 |
To find out if a particular unit in the scheme has been assigned to any wells in your database (and if so, which ones) press Show Wells. This will open a dialog displaying a list of wells which can be Saved as a text file. Note: the title of this dialog is the unit name. |
Show unlinked....
Pressing Show unlinked will open the Unlinked Scheme Intervals dialog displaying a list of informal units which are not linked to units in the current scheme, the number of occurrences of each unit and whether or not a unit with the same name exists in the current scheme.

If the unit exists in the scheme then you will have the opportunity to link the informal terms with the unit in the scheme if you believe that they represent the same unit, when you press OK to close the Scheme Editor Dialog. In this case, all the well intervals which use the informal term will now be linked to the scheme term. They will be displayed as linked terms, and can be used for correlation in the charts module.
If you select any of the informal names in the database, which do not exist in the scheme, the names of the informal terms will be added as new units in the main dialog. You should then set the unit type, an abbreviation if required, and the top and base ages of the unit.
Create surfaces
If you have created a Sequence scheme with a series of sequence units, you do not need to re-enter the surfaces which bound the units: you can use this option to create them. The bounding surface type will be determined by the type of sequence scheme: a genetic scheme will create maximum flooding surfaces at the unit boundaries, whereas a depositional scheme will create sequence boundaries.
Create Units
This is the reverse of the above operation, and is shown on the Surfaces tab in places of the Create surfaces button: if you have entered a series of sequence surfaces, you can create the associated sequence units without the need to re-enter them. The sequence boundaries will be created from the surfaces according to the scheme type: depositional schemes will use the sequence boundary surfaces whereas genetic schemes will use the maximum flooding surfaces.
Page last updated: 17-Aug-2015 12:06