Converting a Database (for system administrators)
Overview of conversion from v2.1.1 to v3.0
The data model (schema) for v3.0 is different to previous models. You cannot run a 3.0.x application against a 2.1 database and vice-versa. To migrate a database the data are copied from an existing v2.1.1 instance into a new database schema created for v3.0. The database utility handles the table-for-table copying and converts attributes as required. The conversion step can copy data across different database platform types, so it is possible to copy/convert a database between all our supported platforms. It is also possible to copy a v3.0 database into another database platform.
Plan your migration
Decide whether to:
-
do a test database migration (using all or some of your own data), and test the new application against this, or
-
to test the application using the demo database, then move to v3.0 in production immediately.
The latter is a simpler approach which will take less time, but there may be a period of downtime while the data are migrated and any conversion issues resolved, during which the v2.1 system cannot be used. Alternatively a test migration will take longer as it will need to be repeated when the production copy needs to be taken, but may be less disruptive to operational work.
You will need to ensure you have at least as much disk space as the existing v2.1 schema available.
Checking the current version
The conversion process is designed to convert v2.1.1 databases. If you have a v2.1 database, you will need to upgrade your database to v2.1.1 before you begin.
To check which version you have, use the Control Panel menu Help | About. Alternatively, if you have a table called DBVERSION, then you should be running v2.1.1 because this table was added for v2.1.1.
The v2.1.1 applications are backwards compatible with v2.1 databases, so if you are already running this application version, you can update the database with no further actions. If you are still running v2.1 and need to be able to use the v2.1 database after the conversion, then you should first update the applications to v2.1.1 by downloading the v2.1.1 software from our website.
If you need to run the update from v2.1 to v2.1.1, contact StrataData for the appropriate script for your database platform.
To update from earlier versions, contact StrataData for advice. Generally, each version’s update procedure will need to be run, until the database is at v2.1.1.
Process overview
-
Install the client software application. This is necessary to obtain the Database Utility which is used to set up and convert the database. You will need a licence to open the control panel, but not to just use the Database Utility launched separately from the installer icon.
-
Start the Database Utility and connect to your database server using the credentials of the v3.0 database schema owner.
-
Create a new schema using the utility ("Create tables" task). You can also save this step as an SQL script to be run outside the utility.
-
Run the role setting script if you are using database roles, typically for Oracle and Postgresql ("Grant table permissions" task).
-
Run the option for converting from a v2.1.1 database ("Copy data from another database" task). You will need to connect to the v2.1.1 database with the schema owner credentials (or a user who has full Read access).
-
The v3.0 database should be ready for user connections.
2. Establish connection to new database
This process detailed here; connection depends on database type. Further platform-specific notes below.
Oracle
You will need to have a runing Oracle database server and an Oracle account for the schema owner. The schema owner must have resources allocated in a suitable tablespace, and CONNECT', `CREATE SESSSION and RESOURCE privileges. Addtionally, if you are copying data between schemas within the same database instance, the v3.0 schema owner will require at least SELECT privileges on the v2.1 schema. This is because, for efficiency, some of the tables are copied via direct SQL insert statements. Typically you will have an SBUGS_USSR role set up for your v2.1 users, make sure this is also GRANTed to the v3.0 schema owner.
3. Create tables
At the main window, the target connection should show a connection to an empty database.
Select the option to "create tables" (1), and then press the start button (2).
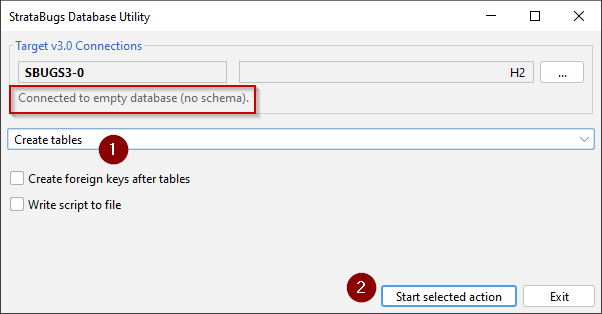
The table creation script should complete:
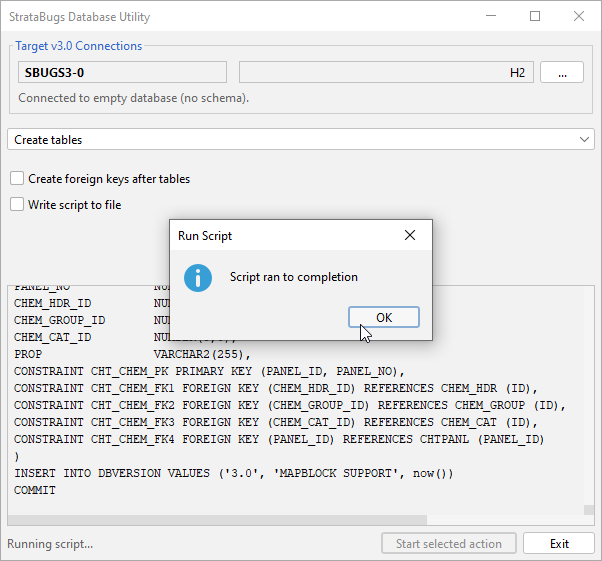
The v3.0 database is now ready to receive your data.
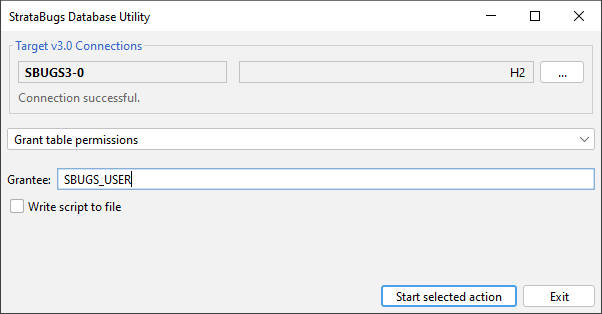
4. Grant permissions
If you are using Oracle or Postgres, at this point you should grant table permissions to a database role that is granted to your users.
You can grant table permissions directly to each user, or through a role. We recommend using a role, and using a role name of SBUGS_USER. If you have users of version 2.1 who already have this role granted, then you just need to run the database utility option to grant the new schema to this role.
5. Copy table data
| If you are copying from an active server database then at this point you should ensure that there are no users connected to the database who are able to add any new data during the copy. This is to prevent foreign key dependency errors. |
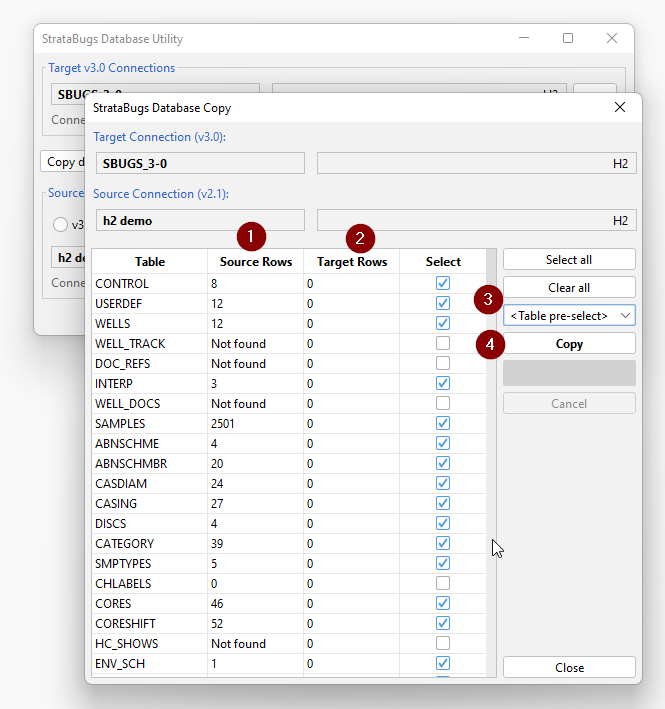
Select the option to "copy data from another database" and press start.
You will see a table-by-table comparison, where all the "target Rows" (2) should be zero. If there are data to copy from the source table, the number of rows will be shown (1); the tables that are "not found" are new in v3.0. Some tables will not be selected if they have no data in the source table.
You can pre-select a reduced set of tables to create a partial database with dictionaries and schemes but exclude any well our outcrop data from the copy (3). You can also opt to select individual tables for copying (using the checkbox in the select column), but since the tables are copied in order to avoid violating any foreign key constraints, it is generally not recommended to switch tables on or off here.
Press Copy (4), and the data from each table will be copied in turn. Some tables will copy much faster than others, depending on the amount of data in the source table.
Monitoring progress
As the copy progresses you can scroll down to see which table is copying. If you have a command prompt window open during the copy, you can monitor the copy progress and see any additional error messages that might appear.
The copy speed will be determined by the speed of the server, the connections, and the volume of data. For a small database it can be a few seconds, for a large database into a cloud server it can be many hours. The two largest tables are generally LOG_TRACE and TAXONOCC. If they have over 1mn rows, the tables can be un-checked for copy initially since they do not have any other dependencies, and can be re-checked and copied after the rest of the tables have been copied successfully.
|
Handling errors
If an error occurs during the table copy, it is important to resolve it before progressing, as the following tables might fail due to missing dependencies. Copy any error messages to support@stratadata.co.uk for advice. It will often be necessary to correct table structure or data errors in the source 2.1 database before proceeding. See description of common errors below.
|
Common Source Errors
If you have problems copying the WELLS table, run the following on the source table in the 2.1 database to find wells with inconsistent lat/long values:
SELECT well_name, well_code from WELLS
where lat_dec < =90 or lat_dec > 90 or long_dec < -180 or long_dec > 180;
If you continue to get an error, try this:
SELECT well_name, well_code, grid_x, grid_y from WELLS
where grid_x > 99999999 or grid_x < -99999999
or grid_y > 99999999 or grid_y < -99999999;
and also this:
SELECT well_name, well_code,td,sl,sb,rte,kicko from WELLS
where td > 99999 or sl > 99999 or sb > 99999 or rte > 99999 or kick > 99999;
The incorrect values can either be set to null via SQL or edited with the v2.1 application.
Deleting the database
If you run into problems, or no longer need the v3.0 tables after a test, you can delete all the v3.0 schema tables using the "delete all tables" task in the database utility.
| The only way to undo this action would be to restore the database from a backup. |
Setting up user accounts
For server databases we recommend that each user has their own database login account. The connection to the database is made using their own login name and password on the Connection dialog. The application then associates the user’s profile within StrataBugs by matching their database account name with the SYS_NAME field of the USERDEF table.
If you have copied a v2.1 database and user account names have not changed, then the database login for the users should work as in v2.1, once they are running the client application and have set up a new connection. If, however you are changing servers or usernames, then the USERDEF table entries might need to be updated. You can do this via direct SQL queries in the database utility, or through the Config → Personnel menu option from the StrataBugs application Control Panel.
Database backups
Your site policy should include backups for your server databases. In addition, you might periodically take a snapshot of the schema. You can use the platform specific backup procedures, or you can use the database utility to create a snapshot copy of the database by copying. H2 databases can be backed up by simply copying the file.