| << Previous | Learning Trail | Contents | Section 3: Taxonomic Database | Next >> |
| StrataBugs Learning Trail | Section 3: Taxonomic Database |
Working with Overlays
An overlay is a grid of taxonomic names which can be used to record taxon occurrences. An overlay can be used on-screen (with a mouse) or on a touch-sensitive screen (see below). The overlay can record quantitative or semiquantitative analyses as well as various occurrence attributes. You can also use an overlay in conjunction with a mobile or tablet device such as an iPad.
In earlier versions of StrataBugs the overlays were printed on paper and overlaid on a touch sensitive keypad (the Concept Keyboard). These keypads are no longer available but v2 overlays are more flexible in that they can be designed at any size for any device (primarily touch-sensitive screens).
Overlays work in two 'modes': design mode and record mode. The overlay toolbar is different in each mode. The overlay frame itself sits on top of all other windows.
Basic steps in using an overlay:
- Create a new overlay and populate it with taxon names in design mode
- Open the overlay in record mode in conjunction with a well
- Record occurrences as you see them
1. Creating and populating an overlay
Create a new overlay:
- Via the Overlays dialog from the Taxonomic Database module: press the
 Overlay toolbar icon or select File | Overlays...
 - In the Samples & Interpretations module by selecting File | Overlay | Add...
You will need to set the name and size of the overlay in the Overlay dialog. When you OK the Overlays dialog, you will see your blank new overlay.
If you have a dual screen display, the overlay should appear on the alternative display to the frame from which it was launched.
To add taxa, you can drag and drop them from any or all of these places:
- The picklist in Samples & Interpretations
- The master table of taxa in Taxonomic Database
- A group internal frame in Taxonomic Database
You can position the names wherever you want on the overlay. The taxon names will be arranged in the same order as they were on the list from which they were selected.
You can drag and drop several taxa at once onto the overlay. Highlight multiple taxa in the list you are adding from and drag them as normal. Select Insert by row or Insert by column to arrange the way these groups are added to the overlay.
You can remove names from the overlay by highlighting them and then pressing Remove Selected cell. You could also press Cancel to put the overlay into record mode without saving any changes made in the design mode.
You can press Auto Arrange to close up any gaps and tightly pack the grid. You could use this to pack the overlay more tightly so it can be edited to remove rows or columns to make individual cells larger and more readable. The arrangement will be in row or column order, depending on the selection of Insert by row or Insert by column.
You can rearrange the cells on the overlay by selecting a cell and dragging it to an empty cell. You can select a group of cells by first selecting one cell, then holding the SHIFT key and selecting other cells. To move this group of cells, you must drag from the top left cell of the selection. While you are dragging, a red outline appears around legal drop areas (which must be empty but can overlap the space originally occupied by the cells you have picked up). If you drop the cells over an illegal space, nothing will happen.
The Camera icon will change the display of taxa from text into images. If there are no images for a taxon, then only the text will be displayed. The selected image will be the first image which has been marked as a "type" in the taxon image list. Double-clicking the taxon in Design Mode will bring up the Taxon Images dialog, where you can browse all the images for the taxon.
When you have added all the taxa you require press the OK button on the Overlay. The Overlay is now ready to use.
2. Opening an overlay with a well
At this stage you may wish to use your overlay in conjunction with a tablet PC. Select the menu option from within the File menu of the Samples & Interpretations module, select an overlay, then follow the instructions on the following dialog to start the server process. If you are not using a tablet, continue as below.
You must have a well open in the Samples & Interpretations module in order to record occurrences. If you do not already have one open, launch the module and open an analysis on the Occurrences tab (Hint: it is easier to find the analysis on the Analyses tab and then double-click it to open it in the occurrences tab).
The title of the Overlay window now changes to the format:
StrataBugs Overlay : Overlay name : Well name : Analyst (/Suite no. if there is more than one)
3. Recording occurrences
Press Q/SQ to switch between Quantitative (numeric) counting and Semiquantitative (ranked) abundance counting.
Quantitative |
You have the option of three size fractions. Use the default (medium) if you do not want to record different sizes. Select the size fraction you wish to record and then double-click on a taxon cell, or click on it once and press the Enter key (either on your keyboard or the overlay). The first time this will add the taxon to the list of occurrences with a count of 1. Subsequently, the count for the taxon will be incremented by 1. You will see the count increasing in the Occurrences table and in the blue text inside the cell. You can decrement the count by pressing the Delete key on your keyboard. Decrementing from 1 gives you 'outside the count'. You can also use the regular Numeric Keypad in conjunction with the overlay to record taxon numbers. Simply navigate to a cell using the arrow keys and type the desired number. The number will appear next to the name in the overlay menu bar. Press the Enter key to record the occurrences. This works in a similar way to the Picklist. If you make a mistake, press the Backspace key to delete the last number typed, or press Escape to clear it. Use the keypad Arrow keys to navigate around the overlay. (Any number keyed in but not entered to a taxon will be discarded). You can also use the keyboard keys as a shortcut for the toggle buttons on the toolbar when in Quantitative mode: R for reworked, C for caved, Q for questionable and M for marker. |
Qualitative (or semi-quantitative) |
For a semiquantitative abundance scheme to appear you must have assigned one to the current Analysis Suite. To do this press (...) on the Analysis tab next to the suite selector to show the Analysis Suites dialog, where you can assign an abundance scheme. The overlay automatically appears in quantitative mode, so you should press the "Q/SQ" button to switch to semi-quantitative mode. The classes of the abundance scheme appear as buttons. Select the abundance you wish to record using a mouse-click or by typing the first letter of its code. To record an occurrence, double-click on a taxon cell, or click once to select it and and press enter. You can navigate around the overlay using the arrow keys. |
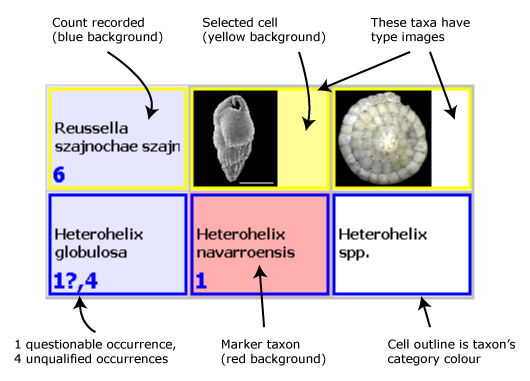
Recorded occurrences appear on the overlay as follows:
If you wish to count a specific number of specimens in each sample you should also set the count limit from the Picklist | Abundance options | Set count limit. Enter the count limit [default =100] and press OK. When the limit is reached there will be a beep and a warning message will appear, subsequently. Occurrences beyond the limit will be recorded as 'outside the count' and marked as '+' on the occurrence list and indicated by a beep. Further records of any taxa previously recorded in the current sample will be ignored. If you do not want to set a limit change the total to 0.
If you wish to qualify the occurrence using a ? (questionable identification), Rw (reworked occurrence), Cv (caved occurrence) or identify a taxon as a Marker you must press the appropriate cells on the overlay before selecting the taxon (or pressing the Enter button). They highlight in red and will stay highlighted, so if you want to record the next taxa without it being qualified, you must press the button again. Note: when in Quantitative mode, you can use keyboard shortcuts to toggle these (see above).
The abundance (numeric or semiquantitative) will be added to the occurrence list for the sample and also displayed on the overlay. Qualified occurrences will be shown separately both on the occurrence list and the overlay. Cells containing taxa which appear in the analysis are highlighted in blue; their abundance appears in the bottom-left corner of the cell in blue text.
The Camera icon in the toolbar toggles between displaying the text or image of a taxon (where present). The recording of occurrences is the same whether displaying images or taxon names. If you want to browse the set of images of a taxon, switch to Design mode and double-click the image cell.
Choice of touch screen
If you are purchasing a touch screen for StrataBugs, then the following feedback might be useful:
"We could find very few touch-screen monitors actually on the market and went for Iiyama ProLite, which has a narrow, positive frame. It's a bit tricky accessing buttons on the edge of the screen - something we didn't think of, but hopefully you can help others not make the same mistake. I think newer models are like a larger tablet device without any frame sticking out, which makes a lot more sense. I would also recommend a large monitor, at least 30 x 50cm, especially if doing diverse assemblages."
Many touch screen monitors are designed for Point-of-Sale use and tend to be robust. We have tested the Elo touch version and found it reliable but not at the same level of interaction as a tablet, which has, for example a multi-touch interface.
Use of an iPad or tablet can allow you to scroll the overlay to overcome the screen size limitation, but this might be distracting. Some experimentation might be required to find the best compromise.
Page last updated: 01-Aug-2014 14:48