| << Previous | Learning Trail | Contents | Section 4: Samples | Next >> |
| StrataBugs Learning Trail | Section 4: Samples |
Samples

Samples form the basis of all well data in StrataBugs; all analyses and interpretations are linked to samples. A sample is a simple combination of a top and base depth, sample type and label. You cannot add any other well data until you have defined samples.
Terminology note: a 'sample' is not the same as an 'analysis'. The sample refers to a physical piece of rock; it may be analysed more than once (e.g. for different disciplines). This can be confusing as in real life 'analyses' are often referred to as 'samples'! You can add analyses at the same time as samples - see below.
How to add samples to a well or outcrop section
If you have not already done so, create a well or outcrop and open it in the Samples & Interpretations module.
There are two ways to add samples:
- Add samples one by one: select the Samples tab, and press the Add... button. You will see the sample dialog (see below).
- To automatically generate a list of samples at regular intervals, select Sample | Generate Sample List... and you will see the Generate Samples dialog.
You can quickly add a list of samples without using the mouse: use the tab key to switch between fields on the Sample dialog, use the enter key to press the OK button, then press enter again to re-open the Sample dialog.
Sample dialog
This dialog enables you to add or edit a sample's depth, type and label.
Note on editing samples: most data in StrataBugs is related to depth or elevation by being linked to a sample. If you edit the depth of a sample, you are by implication changing the depth of all data based on that sample. This includes interval data, where changing sample depths can cause intervals to overlap. Normally you cannot enter overlapping intervals, and they may not plot correctly on charts.
Note that you can generate samples rather than enter each one individually using this dialog.
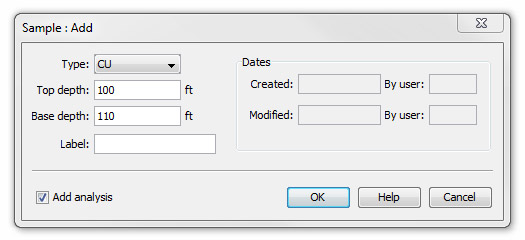
Type |
Select the sample type from the drop-down list. The default sample type is CU (=cuttings) for wells and OC (=outcrop) for outcrops. In addition, you may record SC (=sidewall core), and CO (= conventional core) samples. From version 2.1.1 you can use SP (=spot sample) for bottoms-up sampling where cuttings are taken with the precision of core samples. The LOG sample type is used to position depth-related (i.e. not sample-based) boundaries in Interpretations (e.g. Lithostratigraphic units). |
Depths |
If a sample has a range of depths (e.g. cuttings samples) enter both the Top depth and Base depth. If there is a only single depth value for a cuttings sample be aware of how it has been identified - check whether the value represents the upper (typically US usage) or lower (typically UK, Europe and Rest of World usage) depth of the sample range and enter the it in the appropriate field.
Core samples with single depths assigned, sidewall core samples and log depths can be entered in either the top or base field, but the choice should be consistent. For additional guidance, one field will be disabled if a SC or LOG type is selected, depending on the preferences you have set for default sample depths (Control Panel, Config menu). Fields are not disabled for the CO type as you may need to enter this as a range.
|
Label |
A sample Label of up to 30 characters can annotate outcrop samples, or record sidewall core or core plug numbers. |
Dates |
The Created and Modified fields will be blank if you are adding a sample, but will be filled automatically and display when you subsequently use this dialog to edit the sample. |
When this dialog is called from the Samples tab, you can generate an analysis for the new sample at the same time by checking the Add analysis box. If you have only one analysis suite defined in the well, this will be used. If you have none or more than one, you will be asked to choose a suite for the new analysis.
Edit a range of samples
There are some operations that are more convenient to perform on a whole list rather than one at a time. This dialog allows you to perform one of the selected options on all the samples selected on the samples tab.
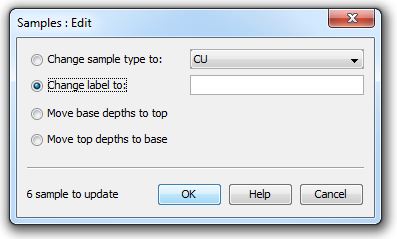
You can only edit sample types where there are no existing samples of the same type at the same depth. The sample label assigned will be identical for each sample. To clear the sample label, select the label option and leave the label field blank. Moving the depths can only be done if the new top or base depth field in each sample is blank (not zero).
Page last updated: 15-Jan-2019 14:08