| << Previous | Learning Trail | Contents | Section 4: Samples | Next >> |
| StrataBugs Learning Trail | Section 4: Samples |
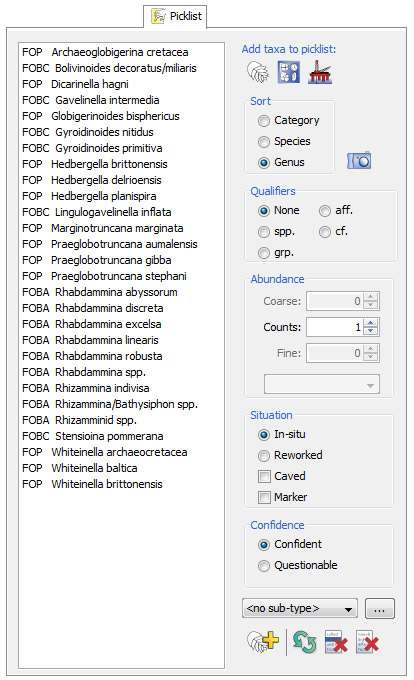
Picklist tab
The picklist is an essential tool for entering taxon occurrence data. The general procedure for recording occurrences with the picklist involves three stages:
- Populate the picklist
- Open an analysis on the Occurrences tab
- Use the picklist controls to enter the occurrence
The general process of recording occurrences is covered in more detail on the How to Record Occurrences page; this page deals with the mechanics of using the picklist.
Viewing the picklist
The Picklist tab comprises a scrollable list of taxon names and a number of controls. You can resize the Picklist by dragging the left hand side of the pane towards the left. You can change the way the list is viewed by pressing the Picklist | View | Single / Multiple columns options. If you have a wide screen, it might be easier to fit more names on the picklist in multiple columns; on a narrow screen it is easier to scroll up and down a single column. You can sort the list by Category, Species or Genus (default) by selecting the appropriate radio button option. You can also elect to show taxon author names and categories in the list, through the menu option Picklist | View | include author / category in taxon names.
Navigating the picklist
You can use the arrow keys to move through the list. If you type a few characters on the keyboard the picklist will reposition itself at the first line which matches. This isn't very useful when you are displaying the taxon categories, but when these are switched off it's a handy way to locate genera easily.
How to populate the picklist
Add taxon names to the picklist in three ways:
- Individually, by pressing the
 icon or selecting Picklist | Insert taxa... from the main menu. Use the Select Taxa dialog to select one or more taxa to add to your picklist.
 - By group, by pressing the
 icon or selecting Picklist | Insert Group... from the main menu. Use the standard selector to select one group to add.
 - By well, by pressing the
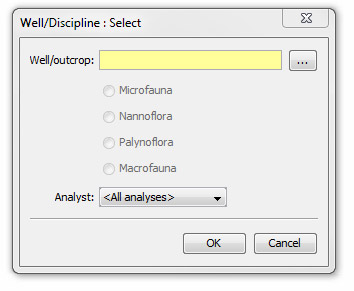
 icon or selecting Picklist | Insert from well... from the main menu. This option enables you to select all the taxa that have been recorded as occurrences for one discipline in one well, optionally restricted to one analyst:
Quantitative recording
Set the tab to click-to-count mode (Occurrences menu or CTRL + M). To record quantitative abundance, select Quantitative mode (CTRL + Q). There are two basic ways to record your occurrences:
Basic method:
Set all your options on the picklist panel (see below for details) and press the 'add to sample' button . All controls (qualifiers etc) are honoured and the count will be incremented by whatever abundance you have set (including each of the separate size fractions, if selected). Set a count of 0 to record a species as 'present but outside the count', represented by "+" (note that unlike previous versions of StrataBugs, you no longer require an abundance scheme for this).
The picklist controls are reset to their defaults.
It is possible to add more than one taxon at a time as long as their abundance and any qualifiers, etc. are equally applicable - use the SHIFT or CTRL keys to select multiple items on the picklist.
-
You can increment (increase by 1) the count by:
- double-clicking the taxon name in the picklist,
- double-clicking the taxon's row of the Occurrences table (in click-to-count mode only),
- or selecting the taxon in the picklist and pressing the enter key on your keyboard.
Qualifiers are still honoured (they are required to identify the right occurrence - see below) but the abundance set on the picklist panel is ignored. You can decrement the count to correct mistakes by double right-clicking in the table, or by pressing the "-" key on your keyboard. Decrementing from a count of 1 sets the abundance to 'present but outside the count'.
However, if you double-click or press enter on a taxon which has not yet been added as an occurrence in the analysis, the counts ARE honoured, as if you had used option 1 above. The picklist is NOT reset to its defaults, because subsequently, double-clicking or pressing enter increments the count by 1, and you need the qualifiers to identify the occurrence. If you are using split size fractions, only the medium count will be incremented or decremented by this method.
Also note: the taxon on the picklist must have the screen 'focus' in order to receive the keyboard 'enter'. Thus if you select the taxon and then press a qualifier button and then press enter, nothing will happen (the focus is now on the qualifier button). Clicking on the taxon or navigating to it with the arrow keys must be the last thing you do before pressing enter to add it.
-
You can set the count by typing in a number on your keyboard (+ or 0 are accepted for 'outside the count') and then pressing enter - but note that you will not see this number appear anywhere on the screen, and it is reset internally when you press enter or select a different taxon.
-
Furthermore, you can edit the numerical abundance by typing in the blue cells of the table (in click-to-count mode only - the cells are locked and yellow in browsing mode to prevent accidental edits). Click on a cell to edit it. You do not need to press enter to save the value - when you move to a different cell (by clicking or using the arrow keys) it will be stored. In this way, you can navigate around the table and type in values, as if you were entering data into a spreadsheet.
Semi-Quantitative recording
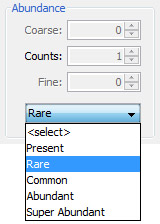
To use semi-quantitative mode you must have set the abundance scheme from your analysis suite (do this by pressing the ellipsis on the Analyses tab).
From the Occurrences menu, select Semi-Quantitative (or press CTRL + M and CTRL + SHIFT + Q).
Select the abundance class you wish to record from the drop-down list on the picklist control panel. Then double-click the taxon name in the picklist. To record an occurrence as present but outside the count, choose the <select> option.
When the occurrence is recorded and appears in the table, you can increment or decrement the abundance class by double-left or -right clicking respectively anywhere in the table row (in click-to-count mode only). Decrementing past the first class sets the abundance to 'present but outside the count'.
Unlike in the quantitative mode, the picklist is reset to its defaults after you double-click to add a species.
Picklist controls
Use the controls to specify qualifiers, situation and confidence.
- Set the occurrence as either In situ (default) or Reworked. You can have separate counts of reworked and in situ specimens.
- If you believe the occurrence to be up-hole contaminants you should also select the Caved checkbox. Unlike reworked, the caved attribute applies to all occurrences of the taxon: you cannot have separate counts for caved and in situ occurrences.
- If you want an occurrence of a taxon in the current sample to appear on a chart in the Biostratigraphic striplog as a marker, select the Marker checkbox. Taxa selected as Markers will be highlighted in red in the Marker field occurrences table.
Hint: you can search for all marker occurrences in the well using the Filtered Occurrences dialog, which you can open from the View menu.
- Record the confidence of your identification as Confident (default) or Questionable.
- Add qualifiers (cf., aff., grp.) or species epithet (spp.) if required.
- Using the combo-box at the bottom of the panel, you can select a species sub-type. Leave the box set to "no sub-type" to record no sub-type. Press the ellipsis (...) to see the Species Sub-Type dialog.
Note regarding qualifiers: The combination of taxon name, qualifiers, situation, confidence and sub-type makes a unique occurrence in StrataBugs. Consequently, the same taxon recorded multiple times with different combinations of qualifiers and/or other features is recorded as separate occurrences in the sample. Furthermore, because each qualified taxon name is a separate entity in the taxonomic dictionary, you may be prompted to add a the qualified taxon name to your dictionary before you can record an occurrence of it in your sample. Note that this does not apply to the 'Caved' or 'Marker' options - i.e. adding this condition to the occurrence does not make it unique.
Then you should then select the abundance. What you see in the abundance area of the picklist controls will depend on what abundance options you have selected (from the Picklist menu) - some parts will be disabled in some modes. The example above is set to quantitative, with no separate size fractions. In this mode, type the abundance into the field or increase/decrease using the spinner buttons. In semi-quantitative mode, select the abundance class from the combo box.
Hint: see this module's menu items page for a mode detailed description of the abundance options.
Other controls
You can view the Taxon Images dialog for a selected taxon by pressing the camera ![]() icon.
icon.
You can clear either all or part of the picklist using ![]() to remove all and
to remove all and ![]() to remove a selection of taxa.
to remove a selection of taxa.
You can reset controls to their default settings using ![]() .
.
Multiple picklists and Saving as Group
You can open more than one picklist at a time. This is useful if you want to separate lists of species. Choose Occurrences > Picklist > Add new... from the main menu bar. Enter a title (under 25 characters) for your picklist. You can change any picklist's title by selecting is and choosing Edit title from the picklist menu. You can open up to 10 picklists at once.
You can save your picklist selection as a taxon group. Select the appropriate picklist and choose Occurrences > Picklist > Save as group from the menu. This makes it easy to re-open your picklist in another session. When you exit Samples & Interpretations, you will be warned if any of your picklists is unsaved.
Highlighting
You can choose to highlight taxa in the picklist that have the highest number of occurrences in previous samples. This gives a visual guide to the most likely occurrences in the current sample, assuming you are working down a well/outcrop. This can be used instead of, or in conjuction with, the feature to insert "unsaved" occurrences from the previous sample.
To turn highlighting on, use the menu Occurrences > Picklist > Highlighting ... from the menu bar. The options are to set the number of taxa to include, and to set the number of samples.
The number of taxa can be specified as an absolute number or a percentage of the total number of species in the previous sample analyses. The number of samples analyses are those of the same discipline or suite which are above the currently selected analysis. If, for example the number of analyses is set to 10, and there were 200 different species in those 10 analyses, and the number of taxa set to 10 percent, then up to 20 taxa could be highlighted in the picklist. There may be fewer taxa highlighted, since the picklist may not contain all those 20 taxa. There may also be greater than 20, since equally popular taxa will be included.
Page last updated: 11-Jun-2015 12:33